Thursday, 9 January 2014

Slice of Saturday Night. Costume Construction. 1960's Dress.

We all have to construct a costume for one of the actresses for their upcoming play Slice of Saturday Night which is based in the 1960's.

Our Costume Tutor had drawn up a basic 1960 A line style dress pattern in a size 12 for us to reproduce and enlarge or reduce (if necessary), for the character we were to make for.

The original pattern was taped down to a table and individually we had to trace the original pattern onto a piece of pattern making paper for our own use.


Once traced I cut my pattern out.
The actress I am making for has a fuller figure so this meant I had to make adjustments to my pattern to enlarge it.
First I cut the top half of the dress away from the bottom half, so my dress will eventually be a top bodice attached to a lower skirt.
I did this as I had to increase the bodice size to accommodate the actresses fuller bust.
I then had to slash the top half of the dress, front and back.


On the front section I made 4 cut lines from the waist line, spaced out and going narrower towards the shoulder. This was so I could spread the pattern out from the shoulder to increase the size of the bodice.
Once cut I spread the original pattern out onto more pattern making paper and re-drew the new larger pattern out.
I also added a further 3'' to the bottom of the pattern to allow for the fuller figure as I would have to gather some of the fabric of the dress.
I knew how much to spread the pattern out as I had the actresses measurements. As the front section I had just created represented a quarter of the size of the actress, I knew to divide her measurements by quarter to get the width I needed for each section. I used a tape measure as I went, checking at each stage to make sure I made the pattern the correct size.

The back section of the bodice I made 3 cut lines that went straight up so I could space them evenly out to create a larger back bodice.


I measured the width that the new pattern piece needed to be and spread the cut pieces on a new piece of pattern making paper to that width and drew an outline to form my new piece. Again I added 3'' to the length.

Once I had enlarged the bodice I needed to enlarge the skirt as my actress also had fuller hips. There were 2 pieces of the skirt pattern, back and front, each representing a quarter size of the actress, which I made 2 cut lines into each piece from the hem line up to the waistline, in a straight line.


I then cut out 2'' wide strips and stuck them between the cut pieces of the original pattern to create a wider pattern to the size I needed. (Originally I had only cut 1strip for each half of the skirt but then realised I had to make the pattern larger, so cut out further strips and added them in). I then taped the extra strips to the original pattern with masking tape.

Once I had made the new enlarged pattern I cut 1 piece each of the front section and back section of both the top bodice and skirt pieces out in calico to make my Toile (fabric pattern sample). I made sure I cut the pattern out on the calico following the straight line of the grain, lining it up with the straight edge of the pattern.

 
Initially when I sewed my pattern sample together I forgot to add a dart into the back shoulder. I had added the bust dart in, which I did have to estimate slightly where that would be on the new larger pattern. I will have to make sure in future that I transfer over dart markings, from original patterns, onto new patterns that I have had to make, due to adjustments and make sure I don't rush ahead with the construction without examining if I have carried out all necessary requirements.
I also had to gather some of the fabric on the bottom of the front bodice piece to accommodate the fuller bust and also to line up with the top edge of the skirt piece.
 
Once sewn together I tried the (half) pattern sample on me and realised I hadn't put the bust gather in the right place, as it was more over towards my arm then towards the front under the bust. I also realised I hadn't put in a dart in the back shoulder.
 
 
I unpicked the shoulder seam and added the dart in and re-sewed the shoulder together, which obviously then made the 2 shoulder pieces not line up with each other. One side was wider than the other. I stitched the start of the seam from the neck, so the overlap was on the shoulder. Once I am able to try my Toile onto my actress I will be able to adjust the arm hole.
I also had to unpick the front section of where the bodice was joined to the skirt, so I could adjust where my gather was. I re-gathered further towards the front section of the Toile and re-sewed with the machine.
 
I am now awaiting to try my Toile onto my actress so I can make any adjustments, ready to make the real item (final piece).
 
I also have to mark where the peep hole at the front of the dress will be on my actress. 


Wednesday, 8 January 2014

Panto. December 2013. Tech Run and Dress Rehearsal pictures.

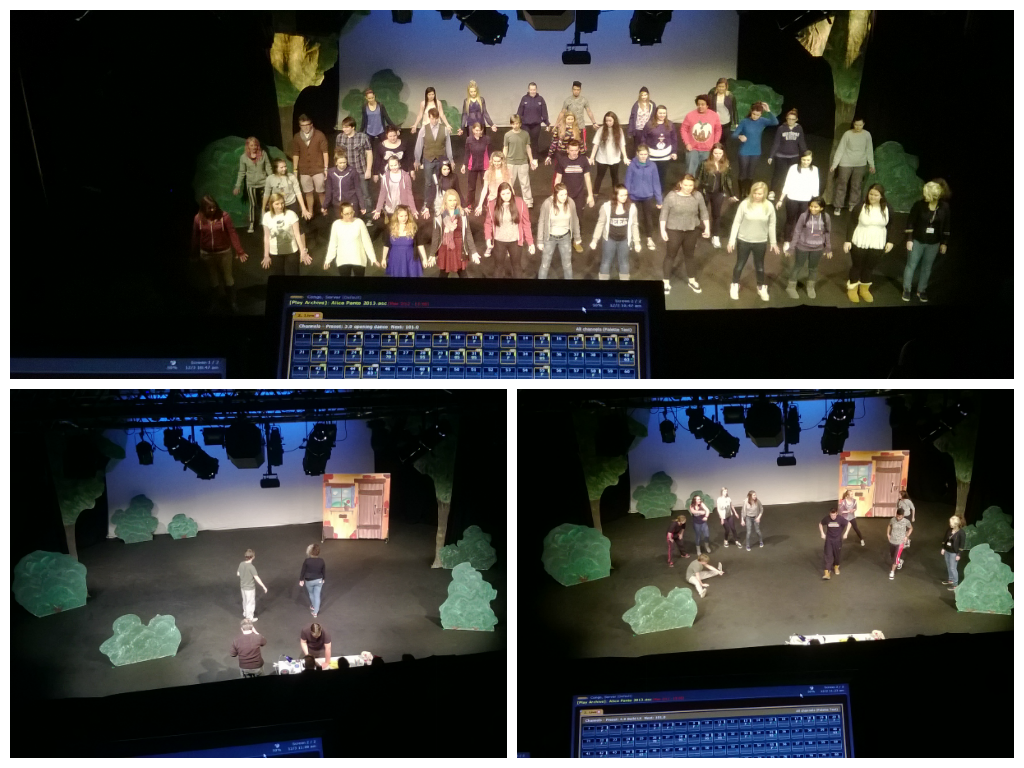
The following pictures were taken by me from the Tech Box during the Tech Run and the Dress Rehearsal.

I absolutely loved watching the show from the Tech Box, it was great fun being part of that team and a good laugh and a lot more relaxed and enjoyable than being back stage doing the costumes, which I had done during the Frankenstein production.

The show grew on me and the students performance improved with each show and they kept it alive and interesting with their adlibbing and extra bits. It kept you on your toes but it didn't make much sense following them with the script as they added a lot more than was on the script given to us to follow during the show.


I loved the scene where the Giants turned into Dwarves. Pippa and I, with some help from Paige, made the Dwarf cut outs (see separate blog on their construction).


Panto. December 2013. Tech Box. Lighting.

During the Panto I worked the whole week doing the lighting in the Tech Box along with Poppy. Kieran and the Tutor worked alongside us, supervising and acting as support.

Monday was presetting the lights and chases. Tuesday was the Tech Run. (See separate blog on cue sheets for more details of this).

Wednesday morning saw the dress rehearsal which had an audience of college students. I operated the chase lights during the rehearsal and poppy operated the lanterns. I followed the cue sheet whilst watching the show and poppy took her cues from the DSM over the 'cans'/'coms' (headphones - communication). Between Poppy and I, we decided we would alternate operating the lights for each show. So on the 1st show, after the dress rehearsal, I operated the lanterns taking my cues from the DSM over the 'cans', whilst Poppy followed the cue sheet, whilst watching the show, operating the chases. The evening show I did the chases again.
My first show of taking my cues from the DSM I accidently operated a light when it should of been a sound cue, oops!! The Tutor rectified this immediately so no big disaster! From then on I listened carefully for LX Q's and Sound Q's. My mistake was that there was a sound Q of the same number as the LX Q which was due next after the Sound Q, easy mistake seeing as I have never experienced working with lights or sound.


When the DSM gave a cue, he would prepare you for the cue by speaking over the 'cans' saying for example: 'LX 22 standby' which I would reply 'standing by' and when it was time to operate that cue the DSM would say 'LX 22 go', on this I would press the 'GO' button for the presets to change from the last cue to the new cue. I would always watch the monitor to make sure the correct preset number was operational and what number was up next. It was important not to hit the 'GO' button until you was given that instruction regardless to if it felt a long wait and it was also important not to hover your finger over the button in preparation as the buttons could be sensitive and operate without necessarily being pushed fully.

 
The above and below pictures shows the half of the lighting desk that is used in getting the channels up and recording the presets and the all important 'GO' button.  :-)
 
 
Below is a picture of the 2 monitors attached to the lighting desk. The top monitor shows the channels, the bottom monitor shows what cue number is operational at that moment and which cue number is coming up next.
 
 
The cue in the gold box is the current cue, the one below in the silver box is the cue waiting to be next. The box below those two, where a white line can be seen criss crossing over each other,will show the top cue fading out and the bottom cue fading in once the 'GO' button is pressed.
 
We did 2 more shows on the Thursday and 1 show on the Friday.
 
The very first, top picture, that has me being seen operating the lighting desk, also shows the other half of the lighting desk that operates the chase light, By pushing the levers up the chases come on, by pushing the levers down the chases go off.


Panto. December 2013. Cue Sheets for Lighting.

During The Panto I worked in the Tech Box helping with the Lighting. It was my job to write the cue sheets which Poppy and I was to work with during the shows. I recorded all the preset numbers cues along with the chases that was to fade in and out.
Our Tutor decided which lanterns were to be used when and where and helped us to programme the lighting desk, presetting the lights and chases that he was aware of, on the Monday of the show week. We gave each preset a name and recorded them. Poppy did most of the presets as she had had some experience doing this and I was happy to observe but I did do some presets.
During the Tech Run on the Tuesday, with the Tutors help, we tweeked the presets that had been recorded on the Monday. This work took us all day from 9am to about 4pm, with breaks.


Above are pictures of my original working cue sheets which were wrote in pencil, allowing me to make changes if necessary. I had never even seen a cue sheet before let alone write one, so it wasn't the neatest of things and I am sure in future I would be able to produce neater copies.  :-)
 
At the end of the second day, after the Tech Run I stayed in the Tech Box whilst our Tutor went and adjusted lantern angles etc and I had to get the channels up so he could see where the lanterns shone, so he could adjust them to the right angle. A list of adjustments that were needed to be done was made throughout the day by Kieran.
 
I absolutely loved and enjoyed my week in the Tech Box and wished I had a more Technical mind as I feel I would enjoy this avenue of work. I would be interested in learning more about lighting and knowing what lanterns to use during the show and what positions and angles etc. It's a fascinating job and I am sure quite satisfying. 
 

Panto. December 2013. UV Canon

There was one scene in the Panto when we used a UV Canon lantern. It was during the Woodland scene with the benches in. There were actors dressed in white cloth as ghosts and it was used so the white would stand out on the dimly lit stage. There had also been eyes painted on the Bush scenery with UV paint so the UV lantern also lit these up during that scene.


I took the above pictures as I had first seen the UV light bulb lying around on the workshop bench, which was no longer any good, and was impressed with the size of the bulb and asked what it belonged to. The second picture shows the Canon without the grill on, as the old bulb had just been removed and the third picture shows the grill in place after the new bulb was fitted.
 
During the Panto the UV Canon had to be operated separately from the main lighting desk and the switch for it was kept in the main switch box on the other side of the Tech Box Room.
When cue 12 (scene change) was called during the performance one of us in the Tech Box had to manually go switch on the UV Canon so it would be operational when cue 13 (the woodland bench scene) was called. The UV Canon would take a few moments to charge up before working and that is why it was put on during the scene change. Before each performance during the rigging check the UV Canon would also be switched on to check if it was functioning properly. Everyone was though advised not to ever look directly at it. During cue 16 the UV Canon was again manually switched off.


Panto. Painting Woodland Benches. (December 2013).

Lois and I was given the task to paint 2 benches we had, which were already made, to look like they had been in the woods for many years. They were to look moss covered.
First we gave each bench a base coat of brown paint then dry brushed black paint over the brown to tone it down.


We tried stippling green paint onto the benches using sponges that had bits cut out from them but after randomly covering the benches all over we was not happy with the effect it gave. After consulting with the Tutor we decided to paint over the green and we started again. This time we stippled using a paintbrush that we had tied string around the bristles to separate them (see picture below). We used a couple varying shades of green on the benches and this time we didn't cover the whole bench with stippled green but just around the edges to give a more authentic moss covered look. We were both much happier with the finished effect.
 
 
The middle top picture above shows the bench covered all over with stippled green paint that we were not happy with.
 

Tuesday, 7 January 2014

Success by Nick Drake. (Performance at Canterbury College 2014)


The Script

Having read through the script I have made a list of key words for each scene, prelude and interludes to gain an insight into the mood that is being portrayed.
I have done this as we have to make 4 large panels depicting headlines which are to support the themes in the production.
Each panel will be 4metres high and 1.5metres wide. (13ft x 5ft approx).
We have been asked to research 1980's headlines and the Yuppie era. Our play will also feature the Monopoly Board.


Main Characters:
Tom - Pretending to have wealth/money but not having any, using his credit card to purchase material things.
Nick - Pulling Tom's strings (portrays the Devil figure).
Lucy - Waitress - her and Tom fall in love with each other.
Eva - Waitress - Likes Nick.
 
Success was inspired by Hogarth's allegorical sequence of paintings The Rake's Progress which showed the decline and fall of Thomas Rakewell.


First Scene:

Keywords
Cheering, affluent, city types, yachts, property, cars, champagne, Bollinger, Cristal, Dom Perignon, brief cases, designer wardrobe, sports car, penthouse, mansions, art.
Money! Money! Money!
Celebration.
Sex, drugs and rock and roll.
 

Prelude:

Keywords
Headlines:- Girl Gang blew up my daughter
                    Time Travel - closer than ever


Scene 2:
 
Keywords
Crazy, bored, angry, drunk, talk shit, kill friends, shadows.
(Greed/love of money)
 
Interlude 2:
 
Keywords
Beauty can bloom from the wasteland.
Magical - Moon Bathing
Magic in all things/ looking at life with different perspectives


Scene 3:
 
Keywords
Keeping secrets, credit (cards), dismissing his family.
Party, over the top, money, expense
Cool, amazing
Rich, famous, important, influential, power.
Recording Truth and secret desires (onto a CD)
 
Interlude 3:
 
Keywords
Opposites (being announced) ie: tooth/nail, pick/mix, bubble/squeak.
 
Scene 4:
 
Keywords
Mirrors - bliss/flattery/dreams etc
Dark/Light
Yearning/Wanting
Lucy - man of her dreams/ Good man
Eva - man of her dreams/ Bad man (money orientated)
 
Interlude 4:
 
Keywords
Broken man/ fallen man
 
Scene 5:
 
Keywords
Regrets/ mistakes
Feeling unlucky
 
Interlude 5:
 
Keywords
Pity/ self pity
Bailing out a friend
 
Scene 6:
 
Keywords
Risk, strategy, gambling, chance
Small win, bigger win
Huge Loss!!
 
Interlude 6:
 
Keywords
Destitute, hard luck, self pity
To rise like a phoenix
 
Scene 7:
 
Keywords
Having everything
Having it taken away (by a friend)
Despair
One moment it's there the next it's gone.
 
Interlude 7:
 
Keywords
Running/ being chased
 
Scene 8:
 
Keywords
Insalubrious locale
Aggravated, displeased. offended, irritable, war path
(Nick did not get any money from Tom)
Deceit/Deception
Pokerface
Loss
 
Interlude 8:
 
Keywords
Loss
Second chance?? Hope??
 
Scene 9:
 
Keywords
Park bench
Imagination
Second chance/love (real love)
Seeing the beauty in life
 
From reading the script I have thought that the 4 panels with headlines could be:
 
Greed
Poverty
Deception
Love
 
or possibly one as:
Excess